Monday, July 29, 2013

 Happy Monday! This past week brought a Wedding! Now we just love weddings and having even a small part in one makes us pretty happy. This time we got to really see the decorated venue when it was mostly decorated so I took some photos for all of you so you can see how the color palette of Blush and Dove Grey can really work for an elegant wedding.
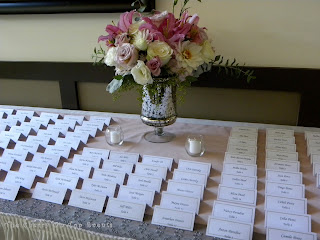
 Normally when we show up to deliver the cake the venue is fairly disheveled and so we don't get to see many of the details that the guests will get to enjoy when they arrive. But this time I was meeting the florist later in the day, closer to reception time so the venue was just about done! This meant that we were able to enjoy details like a fully set escort card table. The venue, the University Club of Palo Alto, is a simple venue with gorgeous flower beds outside the front doors. You walk through those doors and to the left was this beautiful table. Notice the beaded ribbon edge in the grey, the subtle blush tablecloth to set off the silver trimmed cards. Little details that mean a lot.
 The simply elegant escort cards were perfect for this theme. You can have both escort and place cards for a wedding. The escort card lets your guest know which table they will be looking for and the place card will let them know which seat is theirs. In this case there were escort cards only.
The Delicate Daisy ~ House of Flowers did all of the floral for this reception and we just loved how they used silver and Mercury Glass vases to keep the "grey" on the tables. They speak of vintage elegance and romance. Beautiful!
 On the inside of the front doorway to the right was the guest book. It was a simple table which allowed room for guests to place any wedding gifts that may be weighing down their arms, sign in and then go look for their escort cards. 

The grey detail on this table was the grey lace that trimmed the vases filled with crystals, water and floating candles. 
 To continue the simple elegance they set the tables with very light grey cloths, white napkins, silver flatware and simple crystal stemware.
 In the center of each table was a beautiful floral arrangement in a silver vase with a silver filigree trimmed table number tent card. Perfect simple elegance.
 At each place setting there was a folded napkin in between the silver flatware and it was topped with this little favor. Dove grey favor bags filled with wild flower seeds and then trimmed with a pink trimmed favor tag with "Watch Our Love Grow" and their details in grey ink. 
 The florist trimmed the front of the Bride and Groom's Sweetheart table with tons of rose petals. Special toasting glasses, votives and a flower petal filled vase, to hold the Bride's bouquet after the ceremony, finished the look.
 I would have loved to have gotten a full shot of the lanterns and satin streamers which decorated the center of the room but they were still working on it. I was happy to get this close up so you could see that they used both cream and blush pink satin that draped to the corners of the room from the center and then in the center of those streamers was a huge grouping of white and silver paper lanterns. If you decide to use lanterns for your ceremony remember that you do need a lot of them to make look work as this one does. 
 Finally there was the cake table. Covered in white cloth and then again in silver chiffon, the table was set with votives, flowers and the crystal cutting set.
And this was our little part of their day. The Wedding Cake! You can find out all about this cake (and it's secrets) over at Cat's Cakes. Silver and blush pink candy pearl trimmed, this cake fit right into their decor and their day. 

Congratulations again Adrianna and Adam! Thank you for letting us be a part of your special day!

Next week brings another wedding I can't wait to share with you! Hope you can join us again next Monday. In the meantime you can always drop by our Facebook Fan Site for daily tips and tricks!

Cat

Monday, July 22, 2013

 Happy Monday! Today we are going to talk about the "little" celebration. We are talking about the birthday, the job promotion, school graduation, new home celebration. Something that you would invite about 10-15 people to and have at your home. What we call "The Dinner Party" or "At Home Party". Just because you are having it at home doesn't mean it can't have all the glamour of one held at a banquet hall or restaurant. Since I just completed a "little celebration cake" for a client I thought I'd share a little party plan to match.
Now, normally, a little celebration doesn't include invitations but, if you wanted it to, you could order some really beautiful ones for just a little money from websites such as zazzle.com!

 A little celebration can have a gorgeous tablescape! Secret about this one...the gold chargers are from the dollar store and the centerpieces are cleaned used coffee cans covered in pretty gold ribbon! 
A lot of people don't have a tablecloth in their homes but that doesn't mean you can't rent one for just a few dollars from your local rental store.

 Available in your local craft store are little bags of these champagne colored crystals that you can scatter onto the table top for a little more glam!
Make your Guest of Honor feel even more special with little monogrammed centerpieces like this. Just get some alphabet stickers, ribbon and scrapbook paper to dress up gold painted boxes or cans.

 You can even dress up your average dining room chair with some brocade ribbon from the craft store!
And then there are the favors. These little red and gold boxes hide a couple of yummy chocolates inside. You can either buy a set or just find a template online and cut the shape out of whatever scrapbook paper you want to use! Fold up, stick the candy inside and seal. Done! How pretty would these look at each place setting?!
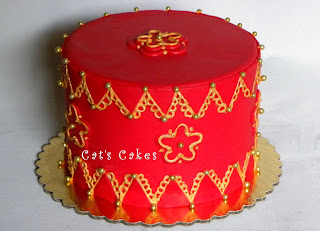
Finally there is cake. A little celebration cake can cost anywhere from $30 to $100 depending on how many servings you need and how ornate the cake ends up being. This one, from Cat's Cakes, serves 15 and cost $90 due to the hand piped and hand painted details. 

What a beautiful way to let someone you love know just how special their celebration is to you! I can't imagine anyone not being touched by such a display of love!

Next week I'll bring you a wedding! In the meantime you can find out more about how this little celebration cake was made at Cat's Cakes and get daily tips and tricks on our Facebook Fan Site!

Cat

Monday, July 15, 2013

Rosie's Hawaiian Themed Retirement Party!

Happy Monday! This past weekend brought us Rosie's Retirement Party! After a little discussion with the clients it became clear that a Hawaiian theme would be perfect! So with the theme set it was easy to start putting together a party plan. Now here is the kicker...we got almost everything from the Dollar Store and our homes in order to dress up this party! Proof that you CAN have a great party and still not spend a fortune. 
 These little signs were already pre-made at the store. One for each table dressed them up perfectly!
 The Tiki God vases are actually glasses I got on a trip last year. When I heard the theme I knew they would work beautifully to hold the multi-colored flatware. Although they may have worked a little too good because a few people overlooked the flatware thinking it was just more color for the table!
 The Dollar Store had these adorable Hula Girl paper plates and napkins as well as the Tiki themed plastic trays. They dressed up the table, extended our theme and were easy for clean up.
 There were even these little Hawaiian candles. Each stood about 4 inches tall and really did put out a lot of light when we lit them later in the evening. (no they were not citronella, just regular scentless which is great around food!) Notice the flowers behind the candle? Yup, just those inexpensive floral leis you see everywhere tucked around the umbrella pole!
 I already had this conch shell and it worked quite well on the cake table. We were even able to get dessert plates in the same pattern as the dinner plates!
You can even find festive paper lanterns at the Dollar Store! We were able to find these that have paper umbrellas on them as well as some with Tiki Gods on them.
 If you have an option to dress the area above your head it just adds that much more to your party decor! We used metallic palm trees for one side and then cute signs like this one for the other side of each umbrella pole. We continued to dress up that space with the paper lanterns. 
 The tables were dressed with colored plastic tablecloths we had slit up to the middle and then wrapped around the umbrella pole and then wrapped with grass skirt tableskirts! One wasn't enough for each table so we wrapped one, using double stick tape, going one direction and then overlapped it again to completely cover the tables. Finally we used plastic tropical leaves to cover the seams and covered where those met the poles with those floral leis and some of the streamers off the metallic palm trees.
 We offered two type of drinks. Tory did an amazing job with the water bottle labels. They quickly became the talk of the party. As each new person arrived they were automatically shown the labels! (click on the photo to see the big picture and be able to read the Retirement Facts!) The Guest of Honor laughed till she cried.
 We presented them in an ice filled aluminum bucket tucked just a bit under the grass skirts of the tables. They were such a hit that most of the guests saved their bottles to take home with them. It has become a signature touch for us and Tory does such a wonderful job personalizing each label for every one for the events!
 The other drink we had was a tropical punch. I found this adorable Hula Girl tray and just knew it would be a great way to present the drinks to the arriving guests! I fell in love with the stir sticks and decided to use them to dress up the plain frosted cups. SO cute!
 Ok, so sharing this recipe...it's so easy! Just put together 2 cups of Pineapple Juice, 1 cup Lemonade, 1 cup Raspberry Lemonade, and 2 cups Orange Juice. Put in some ice and some fresh orange slices and you are done! This is SOOOO good! Ok, ok, confession time. We made this up off a recipe we found on Pinterest that also wanted us to add Ginger-ale. We were going to add it at the last minute so the punch would be bubbly but, honestly, we forgot. But the punch is SO good without the soda it wasn't even missed. We WILL be serving this again!
 Finger foods were what the guests got to feast upon brought in potluck style by the guests. And it was all truly amazing food! These are two types of turkey pinwheels made to look even more yummy by the use of sliced peppers, cherry tomatoes, lettuce and parsley on the tray. These little details really help you to eat with your eyes before the food even gets to your mouth!
 The other side of the same tray were two types of roast beef pinwheels. Giving this type of selection allows your guests who may not care for peppers in their sandwiches to choose the pepper free version. Something for everyone.
 And speaking of something for everyone. These veggie filled Afghan pockets were sublime! Perfect for the vegetarians in the group. They were hot, good and very filling!
 For a summer evening (it was 95 degrees on the patio) it is wonderful to have cold fresh fruit on the table. This freshly cut ice cold watermelon was so wonderful!
 I couldn't wait to share these photos. This is truly how to serve a pre-packed treat. You can get all types of taquitos in bags in the frozen section of your grocery store. But when you go to plate them up fresh from the hot oven, place them on a decorative plate and then sprinkle with grated cheese and then dress the plate up with fresh sliced limes. It proves that you don't have to be a gourmet chef in order to make something look like it came from one!
 And I loved these little signs! Used with an erasable marker, these are perfect for whenever you throw a party. In this case they were used to identify the beef or chicken filled taquitos. 
 Even a veggie tray right from the store can be made to look amazing on the table. I watched how the guest opened up the tray and removed each different item and arranged them upon the bottom tray. And instead of a guest book we had everyone sign a card to Rosie for her to keep.
 Even if you are just serving up cold cuts it doesn't mean your tray has to be boring! By placing these little condiment cups in the center of the tray you get extra texture and color to the presentation. 
Finally there is cake! You can see close ups of this cake over at Cat's Cakes but this beach themed cake really touched the heart of the Guest of Honor. The little sugar Adirondack sand chair, a fru-fru drink on one arm and her Bible on the other as well as the happy crab and octopus really made her happy. I was even able to match the grass skirt trimmed table with a grass skirt trimmed cake! 

This was truly a fun party to put together! I was very happy to be included and to help her friends put together a party that overjoyed Rosie as well as her friends and family and that they had such a wonderful time!

See you next week with an elegant Birthday Party Plan!

Cat

Monday, July 8, 2013

Peach & Grey

Happy Monday! We have been fortunate to have several of our friends get engaged this past Spring and they are in the middle of planning a Summer Wedding for next year. One of the hottest color trends hitting the scene these days is the color palette of Peach and Grey. Here are some beautiful ways to make your own wedding elegant!
 These OneWed.com ribbon tied invitations have lots of character along with elegance. Now here's the fun part. If you happen to be the DIY type these invitations would be EASY to make. It's just scrapbook paper backed cardstock that could be printed out on your computer. Glue dots would help to affix everything, including the ribbon, together and you could get the envelopes from Cardsandpockets.com
As your guests arrive at the venue place a directional sign that sets the wedding mood as well as provides directions to the ceremony site.
Something normally reserved for the reception but could be placed at the ceremony site is the guest book. Little cards placed on the table with pens along with a scrapbook with mini envelopes invite the guests to write a little note to the Bride and Groom while waiting for the ceremony to begin.
This is also a great place to have the Programs waiting for your guests. With Summer weather being unpredictable you will want to consider two things...shade and fans...for your guests. Early morning ceremonies followed by indoor air-conditioned receptions are a great idea but even early morning can be a bit too hot so by having your fans do double duty with your programs you get the information to your guests while also giving them a chance to keep cool! By the way, we are also BIG fans of the water bottle at weddings. Handing these out as your guests arrive is always welcome!
At the beginning of the aisle place a sign welcoming your guests to your ceremony. You can get a $10 frame and some chalkboard paint and make your own chalkboard you can later use in your own home for this elegant yet artistic touch.
 You can immediately set the bar a bit higher with these pedestals topped with urns filled with flowers. Tie a garland over the beginning of the aisle so that your guests will know that they shouldn't walk down the aisle before the Bride does.
 You can easily add some peach color to your gown with a sash but this amazing sash becomes the train on this incredible dress!
 
 A quick reminder. Broaches, long used to dress up the Mom's outfits for weddings are also perfect for your hair! They are a gorgeous bit of bling for your hair if you are not the tiara type of girl.
 Your bouquet should be subtle in color but that doesn't mean it has to be all roses. Use peonies and other filler type flowers to keep your cost down while giving your bouquet texture.
 Are you missing someone you wish were there for your wedding day? A great memorial is bouquet jewelry. I did this myself so my Dad could "walk" me down the aisle. At the end of our ceremony I presented the bouquet to my Mom who, I knew, was also missing my Dad that day.
Keep in mind that it is Summer and long heavy dresses trap in the heat around your 'maids legs. So try to keep the fabric light and the dresses shorter so that they can get air circulation and keep cool in the heat.
Your groom can even have a touch of Peach to his outfit by adding just a teeny bit of peach ribbon to his flower. This boutonniere of a single rose with rose hips and peach ribbon is perfect.
  I adore chandeliers. But with an outdoor ceremony how do you have one with no electrical outlet? Well, now, that's just overthinking things! You don't need to light it up! Take that "traditional arch" and dress it up with flowers, beads and a gorgeous chandelier hanging in the middle. The crystals with catch the light and be a stunning detail for your altar and your wedding photos!
  Outdoor altars are a difficult thing to put together. Usually that "traditional arch" is all that ends up being there. But it doesn't have to be. You can dress up a table with a variety of flower arrangements and candles with a space in between so you have a spot to sign your licence, have a sand ceremony or even a unity candle ceremony. Don't have a pretty table? Even a plain table draped with beautiful fabric would work.  Can you just imagine this table under the chandelier embellished arch above? Gorgeous! 
With an outdoor ceremony make sure to use some of the space for a photo area. You don't have to heft in lounge furniture but a few chairs and extra large paper lanterns make for a beautiful little area for you and your wedding party to take photos.
You can even incorporate your color into your food platters. Welcome your guests to the reception with appetizers that have been garnished with a corsage sized grouping of peach flowers on each tray.
I love this fun touch of using decanters as a style detail! Much more elegant than a bar set up with bottles of liquor, these glass decanters tied with identifying peach tags tied on with bakers twine are perfection! Just have your bartender refill as necessary.
 If you can have your reception outdoors after sunset then consider setting up in a courtyard. Courtyards are designed to be beautiful areas for people to hang out in so why not save a bit on your decorations and use one to make your reception gorgeous?
You don't have to be terribly crafty for this next detail. All you need is lots and lots of ribbon! Cut the shades of peach ribbon into 4-6 foot lengths, chevron the ends, and then just gather them up and tie them to the chairs! Let them drape down for a gorgeous touch that will drift a bit in the evening breeze.
If you have a slightly larger budget then use the color choices available to you for your china at the rental store.
 If you are like most of us, your budget allows the white plates the caterer provides. This doesn't mean you are stuck. Print out the menus with grey ink and place them on top of peach napkins. Then top those with peach paper and grey glitter ribbon wrapped favor boxes. Lots of color and style with hardly any cost!
Table numbers don't have to be hard to do either. These are just cardstock that has been brushed with white glue and dusted with peach and grey glitter. 
If you are having kids attend your reception then make sure to make a corner just for them. Tables covered in white butcher paper and topped with mini chalkboards (you can find these online or at your local craft store) and crayons will keep the little ones happy in between dancing!
Favors don't have to be complicated or expensive either. This is why edible favors are popular. These little glassine bags have simply been filled, hole punched, strung with peach bakers twine and topped with a grey label. You can find the labels online at a website like myweddinglabels.com!
If budget allows, the hot new favor is a photo booth! You get two strips of photos, one for your guests and one for your guestbook! We were actually surprised how much fun this is to do and how less expensive it is to add to your budget than we expected!
As the dancing begins, your girlfriends may be feeling the pain of their high heels. The dollar store has flip flops for a buck. So for $40 you could fill up a crate like this one and give your favorite women the opportunity to dance the night away a bit more comfortably without going barefoot!
 One of my favorite details to come out in the past couple of years is the use of signs. They do not have to be complicated or expensive. Simply printed out on the computer on cardstock and then balanced on a mini easel or decorative plate stand just adds another layer of detail to charm your guests.
 
 A lot is made out of the wedding cake. Obviously since I am a custom cake designer for Cat's Cakes, I am a huge fan of the wedding cake. And usually cupcakes are just not elegant enough for a wedding. However when I find a display that is completely lovely AND elegant I just have to share! By adding cupcake "collars" in peach and grey, different colors of swirled icing and then the lovely little cutting cake with it's whimsical toppers, this cake designer hit it out of the park. Gorgeous!

A word about being a guest at an event where cupcakes are being served. Think of a cupcake tower as being the cake. Just like you wouldn't consider cutting into the cake you shouldn't consider grabbing a cupcake before the happy couple has either cut the cutting cake or shared the first cupcake from the tower. Hopefully most of you are aghast at my implication that anyone would ever do this...however, I have seen it for myself. Along with posting wedding photos from your cell phone before getting the Bride's permission (it is her honor to distribute their wedding photos first) this is my current biggest pet peeve. So even if you are tempted, please wait until you are given the ok before grabbing a cupcake off the tower.

Next week I'm going to be bringing you a fun little retirement party we have coming up this Saturday! Can't wait to share with you all the details from all of our hard work!

Cat