Monday, July 30, 2012

 Happy Monday! This week I am spotlighting a very popular color palette...Tiffany Blue! Recently we attended a wedding with this color palette so some of today's photos are spotlighting that wedding! Congrats again Ashley and Dan!
 Of course we begin with the invitations! These create a wonderful presentation of your wedding color. The bonus is that these can easily be DIY! These from Embellished by Tiffany would fit the bill!
 If your invitation has more than one part, such as directions or an rsvp card, then consider using a "pocket" invitation. These from bodesignstudio would certainly work perfectly to not only get the information to your guests but fit your color palette perfectly!
 This is our friend Ashley on her Wedding Day. The reason I spotlight this photo is that she used her Tiffany Blue color in the men's ties as the perfect color pop to her ceremony! The color along with the chandelier earrings definitely convey the "Tiffany" theme perfectly.
 She didn't stop there! Even her shoes were the perfect shade of Tiffany Blue! What a wonderful way to not only keep your color palette going but also a gorgeous way to present your "something blue"!
 I simply loved the "Mr." and "Mrs." signs on the back of the seats at the Sweetheart Table. These were plaques of painted wood with the letters added to them. Easy, perfect, and beautiful! Just the right touch for this elegant presentation.
 Another touch were the "Table Numbers". In this case it was all about important dates. From the years they were born to when they met to when they were engaged...all the important dates became their table numbers! The numbers were presented to one side of the table and a photo of that year was presented on the other side. SO cute!
 Chair covers and ribbons are a great way to tie in your Tiffany Blue color. Because it is such a popular theme these days it should be easy to find ribbon that matches your decor...just make sure to take a swatch with you to the store. If you have to work with what the venue has to offer then you may be a shade or two off...that's just fine...your guests will never suspect a thing and you save money at the same time!
 The Tiffany Blue Box is quite the hallmark for this look so why not fit it into the decor for your day? Either as centerpieces, as featured above, or on your guest table as a "Card" box. Simply add a rectangular opening to the box so your guests can slip your wedding cards inside.
 Another way to include "The Box" into your theme is the favors. What is wonderful about this theme is that you do not have to get complicated to look elegant. Simply a Tiffany Blue box filled with goodies or a candle then tied with a white ribbon and a simple favor tag and you have an elegant display for your favors.
 Another way to have this look is a photo coaster. Promise a wedding photo for each of your guests in their thank you cards and you have a wonderful "frame" for them to keep your wedding forever.
And, of course, there's Cake! We were pleased to be chosen as their cake vendor and happy to take the design right over the top for this Bride and Groom! Each tier was a different flavor and filling as well as being a different shape and design. From the silver carved wooden monogram, to the white sugar roses and hand-piped royal icing draping of the top tier, to the quilting and candy pearls of the middle tier right down to the modern style wording of the bottom tier, this cake fit the couple to a "T"...including the playful "celebrity" nickname of Dashn. SO adorable!
It fit in perfectly with their elegant decor at the wedding. With a framed engagement photo to one side, a Bridesmaids bouquet to the other side and the beautiful cake in the middle, it was a gorgeous presentation for their Wedding Day. Ashley did a wonderful job making this wedding simply stunning and we at Cat's Cakes were proud to be included and we, here at Cherry, are happy to highlight some of the wonderful details of her day!


See you next week with more Party Ideas!

Cat

Monday, July 23, 2012

 Happy Monday! This week we bring you a 1st Birthday Party to remember! This is a Mom who knows how to DIY for maximum effect! As a friend I was thrilled to see what she put together, even more thrilled to share it with all of you! The party design and decor are by Tiffany Reese of Lookieboo.com and photography is by http://www.marykathleenphotography.com/.


Of course we start off with the invitation! For Ms Ruby's 1st Birthday we were off to Paris! Such a lovely theme for such a feminine little girl!

 The setting was their backyard. I tell you this because a lot of people think you HAVE to have a fancy event space to have a fancy party. Not so! Look how amazing this set up is! From the Eiffel Tower cutout to the giant letters spelling out the birthday girls name to the hatbox with cupcakes on top and the pinwheels on the garage door..this screams out girly, fancy and Paris!
 Paris even made it into the goodie bags! The ribbon threaded through the top of each bag says "Merci Boucoup"! Such a cute touch to tie the bags into the theme!
 The centerpieces are also proof that flowers don't need to cost a fortune to fit into your day. Simple pink and white bud vases with one flower stem each were the perfect way to add a bit of style to each table!
"French" food may not be a hit with the younger set but French Fries always a welcome sight from anyone no matter what the age! This adorable "Frites" or "Fries" bar was just the cutest and most original touch I have seen in a long time. Fresh hot fries were placed into the pink paper lined baskets and then...
 the guests were able to choose their toppings and dips for their Frites! From the usual Ketchup to Garlic Aiolie to Parmesan Aiolie to cheese...there was something for everyone to top or dip their fries into!
 It is always the little touches that make the big difference in a party. from the black ribbon tied flatware in the handle basket at the end of the food line....
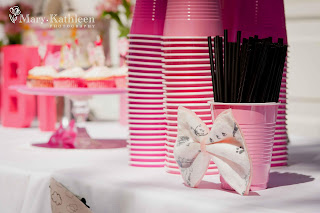
 to the bow tie on the straw cup near the drinks, the details matter. One by one you don't see how they all fit together but when you put them all together they make a continuous theme.
 One of my favorite details is the pinwheels on the garage door. The bow ties in the center of some of them tie into the bow tie on the straw container and the use of the different colors and patterns tie into the pieces like the giant letters and the hat box! 
And, of course, there is cake! It isn't impossible to turn out professional looking cupcakes even if you don't bake! Baked in double liners and topped with a bit of buttercream and adorable Parisian "picks", these little gems are a party highlight!
My favorite detail of all is little Miss Ruby's dress! What a wonderful idea to dress your little one up to match the theme of the party! Whether it's the scenes of Paris, like on Ruby's skirt, or a little construction outfit or super hero costume for a "Dump Truck" or "Super Hero" party, this is a detail that tops the charts for details!


Happy 1st Birthday to our sweet Ruby. I'm so happy you had such a wonderful party! Someday you will look back on these photos and see just how loved you really are and how we were all SO happy to celebrate up your 1st Birthday in a BIG way!

See you all next week!


Cat

Monday, July 16, 2012


 Happy Monday everyone! I'm on vacation this week so I'm turning the Blog over to a guest writer...so please give a hearty welcome to Kristy Laurens! She has all sorts of wonderful ideas for your next party!

How to Plan a Party Without Losing Your Mind
Planning a party may not seem like a very daunting task, until you’re in the shoes of the host or hostess. Whether you’re planning a get together for ten people or a ritzy soiree with a guest list a mile long, planning a party without proper preparation can ruin the experience for any would be host. Planning ahead is the only way to lighten your load as the party approaches. The more you prepare, the more smoothly things will come together at crunch time. Consider following this timeline for your next get together.

Weeks Ahead
Depending on when you decide to throw the party, planning can begin weeks before the actual party date. Invitations can be sent out. Might I suggest digital invitations? Also, you can begin to brainstorm a theme for your party. Whether you’re throwing a Super Bowl party, a My Little Pony birthday party, or a 4th of July Blow-Out Barbeque, the theme is something you’re going to need to keep in mind. You’re also going to want to begin planning a menu for the foods you will be serving and a playlist for the music you plan to play.
    
Williams-Sonoma.com
Three Days Ahead

Start making lists. Lists should rule your party planning procedure. Make a list of all the ingredients you will need for your menu. Also, make a list of all the party favors you will need to buy. Do you have enough serving dishes? Take some time to really think it through and make sure that you have a list of everything you will need to get things started. While a last minute run to the store is possible, it isn’t necessary if you simply plan thoroughly.

abbeyinncedar.com
Two Days Ahead
Two days before your party, you should do most or all of your shopping. Party favors, serving utensils, food, everything in one big trip is the easiest way to go. This will cut down on several trips to town for different things. Put your lists together and plan a shopping expedition that will knock out everything at once. Once you’re finished shopping, go home and clean. Cleaning your house two days before will take care of a lot of the last minute stresses. All you will have to do on the day of is straighten and make final touches.
lasvegasblog.harrahs.com


One Day Ahead
On the day before the party, get started on the food. You can begin to chop veggies and throw together some dishes that can be stored in the fridge over-night. You might want to wait to cut your fruits or anything that might not retain its freshness. Just basically tackle any part of the menu that can be made ahead of time. This will eliminate a lot of last-minute stress.

The Morning Of
Begin the final cooking stages and while everything is going in the kitchen, work on setting the table, arranging the buffet, and decorating. If you already have everything purchased and planned out, this shouldn’t take a long time. Do some last-minute cleaning and spiff up your bathrooms. Wash your pots and pans as things are finished cooking. 

heartonyoga.com

Two Hours Ahead
Get dressed for the party. When you’re ready to go, put on the music and put any necessary finishing touches on the table and decorations while you wait for your guests to arrive.
brooklynfeed.com
Finally, enjoy yourself. Don’t spend your entire party worrying about how things are going. Your friends, most likely, want to spend some quality time with you and will be pleased if you simply enjoy yourself. If you take the time to properly prepare, your party will go smoothly without any frantic intervention from you at all.

Kristy Laurens loves writing about DIY projects, and event planning.

Monday, July 9, 2012

 Happy Monday! Well, with more and more of my friends announcing new pregnancies I thought it would be a fun idea to share this adorable Baby Shower theme this week! Cute As A Button! 


Perfect if they are having a boy or a girl or if they are waiting till birth to find out. Very "gender neutral". There are not many themes out there now that are neither boy nor girl colors so it can be very hard to find a theme to go with if you don't know or if you are not wanting to go with the traditional "Pink" or "Blue" shower colors. First, the invites!

 These would be super easy DIY invitations to make. Just print out the wording, leaving space for the buttons, then trim with decorative scissors or an edger punch. Super cute! Of course if you are not the DIY type there are dozens of invites online that will be just as adorable.
 Most baby showers happen in someones home so you are left with "areas" that you can decorate rather than an entire room. These banners make it easy to decorate small spaces and still have cute details.
 Just triangles of cloth with glued on buttons then attached to a ribbon is all that goes into this banner. Easy peasy and perfect to decorate the entrance, an archway or the food and cake tables.
 You know I love a mason jar treatment! These are super easy. Glued on ribbon with glued on buttons. Use color coordinated straws and you have a super cute look!
 Same for the flatware. Usually baby showers have plastic flatware and paper napkins and it's harder to "dress" those up. Simple with this idea. The "ring" is just a strip of paper that's been either glued or taped around the flatware filled napkin and then tied with thin ribbon and a button glued on top.
 Little signs on the tables, whether that be the food or coffee tables, are a really nice little detail that can only add to your day. Look online for "printables" that you can easily use to dress up your party.
 Button cookies are just SO simple to make. Use any round cookie cutter to cut out the basic shapes then look for a small jar with a flat bottom to make the round imprint in the center of the cookie and finally just put  4 holes then bake. You can even divide your dough into sections, dye each section with food dye, to have colored button cookies!
 You can even then take those cookies and package them up in favor boxes for your guests! Just line your boxes with tissue paper then tie up with some colored bakers twine and add a tag. CUTE!
 There are plenty of "non-edible" favors out there as well. These little frames would be adorable to hand out with a promise of a baby photo with their thank you card after the baby is born!
Finally there is cake. This cake from Just The Frosting would be SO adorable. You could mix the pastels if you don't know the sex yet or go with the traditional pink or, in this case, blue if you know the sex and even the name of the baby to be. SO cute!

If you use this theme or have already used this theme in the past let me know! I'd love to see what you come up with as well!


See you next week!

Cat

Monday, July 2, 2012

Happy Monday! Here in the USA we are getting ready to celebrate our Independence Day on the 4th of July. It's a HUGE "to-do" with fireworks and bbq's and lots of family gatherings. However, not every party you are going to throw is going to be a huge event with fancy clothes, flowers or favors. Some of them are little family parties to celebrate a birthday. Today we are going to cover a theme that can be used for any small party from a a childs birthday to an adult birthday to an Anniversary party...Banners!
These adorable banner invites from My Personal Artist are just so cute. You could easily make your own by printing the blank cardstock on your computer with the party details and then glue colored thread across the card in a swag formation and then glue on little scrapbook paper flags to complete the invitation. If it's a small party and you only need a few invites, this is the way to go!
 Banners are really very easy to make from scrapbook paper. You can also just use a stick on alphabet to spell out whatever sentiment, from your honorees name to Happy Birthday and more, across the whole banner.
 For those of you who sew, and I am not one of those people, you can make them out of cloth as well and use seam binding tape or pretty ribbon to make the flags into a banner. Very cute and great for outdoors!
And speaking of using the outdoors for your party! What a great idea to swag your backyard with banners crisscrossing and at different heights. Just make sure that if this is a walkway to put the banners up higher than your tallest guest. I love to hang them in corners so they don't impede party traffic.
 If  you don't have an open space but still want to include the banners into your decor then use the cake and food tables to hold the banners. Either attach them across the tables, like the photo above (which also shows how this can be used for the guys too by changing it from pastels to Earth tones or primary colors!) or
swag the banner on the wall behind the cake and food tables. If you are having the party outdoors you will still want to have the food in the shade so the side of your house would make for a perfect place to hang your banners.
 Another cute way to incorporate the banner theme into your tables is to use small decorative bottles to hold up mini banners! Just glue your flags onto string or thread and tie to skewers. If they don't want to stand up in the bottles just fill them part way with salt to help give the bottles a little more weight and hold up the skewers.
Whatever your colors are for your party theme, you can continue the decor by using straws that echo your palette. These are the "oh so in trend" paper straws but the regular grocery store straws might fit your scheme as well...take a look and save a bit whenever you can.
Another cute way to continue your decor is in the dessert! If you are serving cupcakes for dessert, or cupcakes for the kids and cake for the adults, you can make these cute little flags, glued onto toothpicks, to stick into the top of your cupcakes. 
You can also frost your cupcakes and decorate using sprinkles and colored cupcake liners to coordinate with your theme! You can even buy whole kits so you don't have to DIY as much if you'd rather buy it than do it yourself.
 If you are making an entire cake to serve this is a cute way to add the banner to your cake. Made exactly the same way as the ones for the tables, this can add a wonderful touch to your simply frosted cake.
 If you want to raise the difficulty up a notch, what about a double banner for that cake? Triple? It is easier than you think!
Lastly, you can put the banner on the sides of the cake tiers. You can use paper or fabric to make this gorgeous display like the Caker at The Cake Parlour did. Even just one tier sporting this treatment would wow your guests and help make the guest of honor feel that much more special!


Next week we'll bring to you a simply adorable Baby Shower theme!


Have a great 4th of July!


Cat