Tuesday, August 27, 2013

Beach Bag Birthday Party

 Happy Tuesday! This past weekend I got to do a fun little beach bag birthday cake for a client who was surprising his wife at a small family birthday dinner party for her. So I started thinking how much fun it would be to have this as a party theme and all the things you could do with it!
 First the invites! These from zazzle.com are super cute and affordable! At only about $2 per two sided invite these would be SO cute for a small party!
 Ok, so this looks really involved right? It doesn't have to be. Plastic tablecloths from the dollar store used as layered backgrounds as well as layered tablecloths AND cut up into strips for the "seaweed" layers with fish cutouts and circle punched bubbles would go together really quickly and easily.
 More dollar store finds are the different colors of blue paper napkins wrapped around clear plastic flatware and then tied with twine. And don't forget to add a little Life Saver in each bow!
 Serve grilled food that fits your theme. Do you love seafood? Then these grilled shrimp skewers wouldn't just be yummy but they would cook up really fast for your guests!
And speaking of grilling! Grilled pineapple is all sorts of yummy! Just slice into thick strips and insert your skewers. Grill till golden on both sides to bring out the sugars in the fruit! YUMMY!
 As with the table setting, this looks really complicated but it really isn't. Just cut off the end of a long watermelon on a slight angle. Now use a sharpie marker and draw on the big wide mouth, including teeth. Just like carving a pumpkin at Halloween, carve your watermelon the same way. Scoop out a bunch of the melon and chop it up. Mix it up with gummy fish and you have a very cute display that will have everyone talking!

 Blue drinks are easy to do with Blue Curacao. Just mix with lemon lime soda, white cranberry juice and/or vodka and top with a wedge of pineapple and you have a great ocean colored drink for your party! (want two colors of the same type of drink? Add pineapple juice to your drink and it will turn green!) Set out a bunch of these on the food table and they instantly add to your decor!
 Don't forget to serve a non-alcoholic drink as well. Blue gatorade with lemon-lime kool-aid or soda is delicious and wonderful served over ice. If you don't have a great decanter like this one you can just set out a pitcher filled with lots of icy drink mix.
 Of course you can just take the easy route, although not the least expensive route, and buy a soda that is already colored blue like the Berry Lemonade Soda from Jones! Chill them in the fridge overnight first and then set out in a tub of ice for the party.
 If this is a family party don't forget the kids. These little sailing cups are just blue jell-o that has been set up in the plastic drink cups then topped with a mandarin orange for the boat and paper sails on toothpics! SO cute that the grown ups will be grabbing them too!
 Don't forget the kids when it comes to favors either. The dollar store always has lots of pool and sand toys this time of year so take advantage of their sales and group together a few toys for each kid to take home for just a few dollars each!
 We loved these little candy filled mini beach bags for the adult favors from favorsandflowers.com. For about a dollar each you can fill them with any type of candy and still keep your budget! 
The last touch would be, of course, a fun cake like this beach bag cake from Cat's Cakes! What birthday girl wouldn't be happy to end her day by blowing out a candle tucked inside the "beach towel" and make a wish?!

Hope I gave you some fun ideas! This week brings a little girls Barbie Party! I'll share on Monday!

Cat

Monday, August 19, 2013

 Happy Monday! Today we are going to present a home party for Baby's 1st Birthday. Except for the cake it's all DIY and we'll show you ways to do this for a low budget but with high impact!
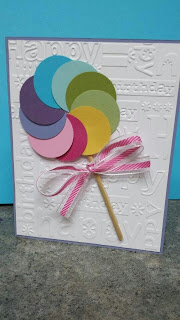
 First off, the invitation. Pick out your background paper. Print the invitation information on one side and then turn it over. Now take embossed scrapbook paper, cut just about a quarter inch smaller than the background paper, and glue it (using scrapbooking adhesive) together. Now punch out circles from different colors of scrapbooking paper and glue into a circle. Finally tie a pretty ribbon around a wooden skewer that's been cut into a 2-3 inch length. Run a thin bead of hot glue down the skewer and lay it onto the card and then top with the circle. This only takes a few minutes per invitation and, since you are using several different colors for the invite you can also use lots of different colors in your party design!
 Chalk Art signs are all the vogue right now and fairly easy to do if you have good handwriting and some time on your hands. If you don't, and it would be a stretch for me, you can have one made. Check out Etsy for help. They are only about $20 and make a wonderful keepsake for the baby's room!
 Remember all of that multicolored scrapbook paper you had for the invites? Use the scraps and a smaller paper punch to make rainbow confetti. Stick a handful inside each white balloon and then fill with helium. Beautiful! If you don't have the budget for helium then just blow them up and hang them upside down from your porch, the trees or ceiling!
 We love this idea of punching out butterflies (or cutting them out like you would hearts for Valentines day) and then sticking them all over the party space!
 When you look at this set up it is easy to think that it would be too hard or cost too much. But lets put a new spin on it. If you have a covered porch or awning, just get lengths of tulle (really inexpensive at your local fabric store) and tape/staple/glue it to the top of the porch or awning in about 6-9 ft wide lengths...making sure to "pleat" it as you are attaching. Then gather it up about 3/4 down the "drape" and tie with a pretty bow. Those can be white plastic tablecloths topped with pink plastic folded tablecloths and those can be balloons floating at the top of the porch or awning. See how easy that just got? Not to mention more affordable?
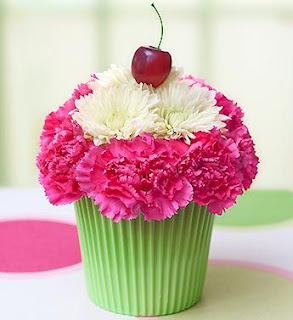
 Speaking of affordable. People overlook the poor carnation but it's a wonderfully affordable flower that stands up to heat and mistreatment. Mums are also great in hot weather situations but they do cost a bit more so use them, like they did here, as an accent flower. Totally cute centerpieces, and you only need two or three, for a very cute party!
 You may not have pretty pink painted chairs but that's ok. Take strips of white and colored tulle and knot them around the chairs you do have to make laced up "skirts" for your chairs.
 We always do up personalized water bottle labels but if you don't have the time for that you can still dress the bottles up easily. Buy some stick on gems and then wrap your bottle (after removing the label first) with plain white printer paper strips with double stick tape where the ends come together. Then wrap with wrapping paper ribbon and attach with more double stick tape. Now top the ribbon with the gem! Pretty Bling!
 We love these personalized outfits from Etsy. Now, in our experience, the one year old doesn't do too well with the tutu idea (too much skirt, not enough height yet to carry it off and walking is still a chore) but we love the onesie!
 You can even get one totally personalized with your child's name on it! Perfect for those photo ops!
 If you are having the party indoors or if you have an arch, this would make for a really fun play area for the kids! Hang the balloons down far enough from crepe paper ribbon so that they can run through the arch and be happily knocked about by the balloons. Prepare the adults for lots of happily screaming kids!
Finally there is cake. The artists over at Le Cupcake created this beautiful cutting cake along with the kid friendly cupcakes. You can also have one special cupcake made up just for your baby. What a pretty way to celebrate her first birthday!

So you can have a wonderful, beautiful, birthday party that looks like a million bucks and doesn't cost anywhere close! Just DIY it!

Next weekend we will present a beach party birthday! See you then!

Cat

Monday, August 12, 2013

Happy Monday! One of my caker friends had a Monsters, Inc. party for her Great Grandson this weekend. It inspired me to create a low cost party plan to share with all of you on the same theme! A great party doesn't have to cost a mint.  
You can find lots of fun, and affordable, designs for invitations over at Etsy! These are only $10 and you get a personalized digital file that you can use to print out as many invitations as you need! 
 Of course there is Party City for the party supplies! There are lots of choices when it comes to the balloons. You can buy all solid color balloons and just one mylar or you can use several other mylars to decorate special places in the room.
 And speaking of using solid colors to decorate. You can pick only one or two items that are truly logo items and make those the spotlights to carry the theme while using the less expensive solid color items as background. You can hang colored lanterns, even make them into "Mike" by adding layers colored circles for his eye!
 Tying off those balloons with the "Monsters Inc." colored curly ribbon is an inexpensive way of adding even more color into your party.
 Cups and flatware, as well as the tablecloths can all be found at the dollar store or discount store to help you add to your decor without taking up too much of your budget.
 LOVE the Juicy Juice boxes with Monsters Inc characters on them. They are popular right now due to Monsters University, of course, but why not take advantage of that?
 If you can't find the Juicy Juice boxes then you can make your own. Like with the paper lanterns just use plain paper to wrap the box then layer on colored circles to make Mike's eye.
Party City even has colored hard hats! Print out Monster's Inc. logos, punch them out with a circle punch and use a glue dot to attach to the hat! Use stick on alphabets to personalize each hat with the guests name and it makes a great take home favor! CUTE!
 Yes, Party City has the whole set up. For 8 guests you get a lot for only $30. This set up would make a great starter that you could then expand on with solid colored items!
Not everyone is a cake artist. And if you are trying to save a few dollars, or a lot of dollars, then make cupcakes. Just frost with green and then add a big circle of white, a slightly smaller one of blue and then add a black center of icing or candy (an M&M would work great for this!) and you have "Mike" cupcakes. Print out one of the many free party logo sets that are available online and attach to coffee stirrers to stick into the top and you have one cute dessert!

Lastly, there is a CONTEST going on over on our Facebook Fan Site! So stop on by, share lots of our tips or photos that we post between August 2nd and September 2nd and you are entered into the contest! The person who shares the most tips and/or photos for the entire month wins their choice of one of three gift cards! So stop by every day, share that days tip or photo and you can win!

Monday, August 5, 2013

Happy Monday! This past week was a busy one for weddings! We were part of a last minute one that we were overjoyed to help make beautiful! With the passing of the Supreme Courts decision to allow Same Sex Marriage here in California these two Bride's...together for over a decade...decided to get married while everything was legal. The complication was that they were also moving to another city for their education so while making wedding plans they were also packing up their home! So they married on Wednesday and moved on Thursday! While this made for a really crazy week for them it also meant their home was totally empty on their wedding day...making it a perfect air conditioned reception site! 
 Guests were welcomed with this door hanger that we made for them to take to their new home as well as to add decor to their reception site. Totally DIY, this hanger was made from a pre-cut frame, letters and shape from Michaels and then glued together, painted and then trimmed with their wedding ribbon.
 After being greeted at the door, guests were encouraged to sign the guest book which was on the corner of the food table.  
 We used both paper lanterns and tissue paper poms to decorate the entire space. They have two advantages; they are inexpensive and they are easy to assemble. This made for a quick set up of the space between the ceremony and reception times.
Their colors were aqua, peridot and silver so we added a silver pom to the bunch hanging over the food table.
 We used lanterns on the walls along with some tulle....
 In the center of the ceiling to create a "dance" area...
 And even in the corners of the room to help dress it up!
 The tables were dressed with white tableclothes, paper lanterns and pom poms in their colors. Silver and white plates were used for the food and cake tables.
Forks were wrapped with silver paper napkins and then tied with ribbon and decorated with little crystals for a bit more wedding bling!
The food table featured all cold foods to counter the hot summer day outside. 
Table Tent Signs were used at each point to dress up the tables.
 Several different sandwiches were purchased premade from the local sandwich shop and then unwrapped and arranged on the tray with big tongs to make it easy for the guests to choose which sandwich looked best to them. 
 Then the salads! There was literally something for everyone in the salad category!
 Pasta, green, and fruit salads made for a very colorful presentation for the table!
 Since not everyone loves peppers they were sliced and placed into a tray at the side, themselves making a very colorful presentation!
 Using lots of different types of fruit in the fruit salad allows guests to have a choice. This one had watermelon, cantaloupe, strawberries and grapes. Wonderfully ice cold fruit for a hot day!
 The cold pasta salad had olives, cucumbers, tomatoes, onions and celery in it along with a light dressing. Heavy food would have made everyone feel weighed down so the light fare was perfect.
This mixed salad came along with the sandwiches. It was a mix of greens, tomatoes, cucumbers, peppers and feta cheese. The Mother of the Bride provided 3 types of salad dressing along with grated cheddar cheese.
Available drinks were punch, bottled water and wine. They were set out on the bar near the kitchen with back ups stored in the fridge.
 An ice heart floated in the punch bowl. Fresh berries were frozen with spring water in a heart shaped mold and then, right before the reception began, it was unmolded and placed into the already chilled fruit punch.
Of course there were personalized water bottles! Tory custom designed these for the Brides and included the little loving pink flamingos that also top the wedding cake! 
 The kids were all over the chocolates set out next to the drinks! We would find them sneaking over for another bite when they thought we were not looking!
 Also on the bar were the favors. Little bottles of bubbles and packages of buttermints made for a combination of use now (the bubbles for the dancing) and take with you (the mints in the pretty bags) favors for the guests.
 Each bottle of bubbles was labeled with their names and wedding date. They were really good bubbles too! We had fun blowing the bubbles during all of the dancing as well as playing with them the next day at home with the kids!
 We dressed up the bar area by hanging three extra large paper lanterns over it. This added more texture to the walls as well as more color to the room. It is good to think ceiling to floor when decorating a space.
The cake table was a multi-piece focal point for the room. We featured their colors in the poms on the wall as well as the dots on the wedding cake.
 The Bride's bouquets helped decorate the table as well once they were tucked into a pretty cut crystal vase. Toasting glasses and a cut crystal cake cutting set were decorated with the wedding ribbon and a pretty table sign added an elegant touch.
And speaking of the toasts! As with every aspect of your wedding you don't have to have the "traditional" choice when it comes to your toasts! If you don't drink alcohol then have whatever your favorite drink is in your toasting glasses. These Bride's don't like champagne so why have it at the party?
 Instead they invested in their favorite wine to serve as their toasting drink and for their guests.
 
 Because they were moving the very next day the couple didn't want to purchase a lot of serving ware so a mix of paper and plastic as well as crystal were used. The Mother of the Bride figured that the Bride's could always use wine glasses in their new home so they were a good investment as well as a small container to pack for the move. It also made toasting the couple feel a little more elegant.
Before the sand ceremony the pieces, a specially made frame and color sand filled vases, added a colorful touch to the bar area.
 Once the cake was cut and everything cleaned up, the Sand Ceremony was set up on the Cake Table.
They blended the two colors into the specially made frame that will decorate their new home!
 And now the Cake! This swiss dotted confection was from Cat's Cakes. Decorated in the Bride's colors and dotted with little candy pearls it was made even more perfect for the couple by the addition of the pink Bride flamingo cake topper!
 
The adorable custom made topper featured veils held on with flowers in the Bridal colors! They captured the bright, colorful, fun loving spirit of the couple and will make a great keepsake as they begin the next stage of their lives together as a married couple!

We had a wonderful time with them. We danced under the lanterns and poms with bubbles floating around us, enjoyed all of the great food, the toasts and the lovely sand ceremony at the end. A huge Thank You to this couple who included us in their very special day! Congratulations again!

Lastly, there is a CONTEST going on over on our Facebook Fan Site! So stop on by, share lots of our tips or photos that we post between August 2nd and September 2nd and you are entered into the contest! The person who shares the most tips and/or photos for the entire month wins their choice of one of three gift cards! So stop by every day, share that days tip or photo and you can win!

Cat