Monday, March 26, 2012

Happy Monday! This week we tackle Birthday Parties! I know a LOT of little girls turning 1 this year and so I thought, why not use one of my favorite, and very popular, themes to show how you could put together THE most adorable party for your little girl. PARIS! Then I gave it another moments thought and figured out that your older girl, or hey, even YOU, would love to have this party theme too! So this sent me researching to all the corners of the web, including Pinterest of course, to see what I could find...and did I find a LOT of really cute stuff to share with you all this week.


First up, of course, are the Invitations! Invite everyone to come join you in "Paris" for the afternoon with these totally great "Passport Invitations" I found on Etsy! The outside says "Passport to Paris" and then inside....

Looks like a Passport, including a photo of the Birthday Girl! So absolutely cute. Wouldn't you LOVE to get one of these in the mail? Imagine how much your guests would love to be invited in this way!
No onto the set up. I'm including four different ideas for four different reasons. They are all Pink and Black to match the theme and each shares qualities with the others but there is one thing that stands out on each one that I wanted to share. The first one, pictured above, shows how you can really dress up your food and cake tables just by remembering to dress up the wall behind them! As simple as buying a couple of yards of fabric and tacking them to the wall, this idea really makes a wonderful backdrop for your food and desserts!

 As you saw in the first set up, the second set up uses a banner on the wall to help dress up your backdrop as well. This is a great way to say Happy Birthday or just put the Birthday Girl's name up for all to see. On this table, their dessert table, they included a copy of the invite and the favors as well. Making it easy for your guests to enjoy the theme while reminding them to take home a goodie!
 If you are having a sit down party what a great way to dress up your table than with these patterns. And how easy! You can buy printed napkins even in the grocery store these days and the placemats can just be 12x12 pieces of scrapbook paper! Easy! For this table they used patterned plates but simple white plates would work just as well.
Now, if you really want to dress up your space consider using tulle on the tables. Tulle costs almost nothing and you can easily punch up your tables by using several layers of it. Consider alternating pink and white tulle for a multi layered effect. Notice how they used draped tulle for the entrance way as well!
And not onto the food. These adorable little pink cookies with "Hugs" in them are so easy to do. It's just a sugar cookie dough that you can add pink gel color to, sprinkled with pink sanding sugar right after baking and then chocolate "hug" placed right in the center while still hot. Yummy AND cute!

Cupcakes and cookies make for a wonderful addition to any dessert table, notice the incredible cake in the background too, but flat plates don't do them justice. Think about using this idea of stacking cake stands to make a bigger, more elegant impression.

More for a kids party than for an adult, these cute little bottles of strawberry milk are easily dressed up with some scrapbook paper strips and heart stickers as well was red and white striped paper straws. Put a tiny Eiffel Tower sticker in the middle of the heart and suddenly they "say" I love Paris! How cute to serve to the kids with their dessert course!

A bit more adult are the drink glasses with the Happy Birthday stickers on them. Yup, stickers. You can buy them at your scrapbooking store and just peel and stick them to the clear tumblers you get at the grocery or party supply store. Notice how the paper straws add just a little bit more, even to empty glasses!

A great way to serve a refreshment as well as giving your guests an extra favor is to put on some personalized water bottle labels. These are a favorite of mine because they also used a bit of "bling" on the bottles which fits in perfectly with our theme! Also available in scrapbook stores or craft stores, these gems are just peel and stick. How easy is that?
And speaking of favors! These incredible Eiffel Tower cookies would make a simply wonderful little gift for your guests to take home from your Parisian Party! These are from Sweetopia and worth every penny! Amazing cookies!


Lastly, we adore these little Eiffel Tower keychains that we found on www.littlethings.com for your guests. For years after your party your guests will be able to look at their keychains and remember what a great party it was and what a great time they had with you.

I don't even have a little girl turning one, or 7 and I suddenly want to have a Let's Go to Paris Party!! Hope this weeks post gave you a few ideas for a great party for your little, or big, girls upcoming birthday!

Cat

Monday, March 19, 2012

Happy Monday! I hope your St. Patrick's Day was great, that you were able to celebrate either out on the town or around the family dinner table. As with every year, the day after brings up conversations about Easter. So we figured that this week we would give you some ideas that might make your Easter Day a little more colorful and fun.

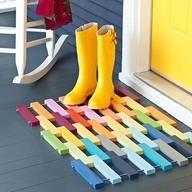
The first thing people see when they come to your door is your doormat. What a fun touch to set this one out each Spring? Just start out with a wooden or rubber mat and paint the slats. Instant color pop!
And while we are still at the door, how about a new wreath for the family and for Easter? This one is ever so easy to do. Just take strips of tulle and tie them around a round styrofoam ring, add your family initial and some glittered plastic eggs and you have an all weather wreath to brighten up your front door!
Now to the entryway. Do you have a table there to catch your keys? A simple globe vase with a pillar candle, either colored like this one or a more versatile white one, with little plastic egg beads or jelly beans for Easter (or candy corn for Halloween, or candy cane beads or pine greens for Christmas) will brighten up your hallway as your guests enter your home.
Pictured above is my favorite banner of the season. Made with paint chips you can get from your local hardware store, this is an almost free craft project that the kids can help with to add an extra decoration to your home.
My second choice is this pop-out egg banner. Just cut out two of each egg, fold one of the pair down the middle and apply glue there and then place it on top of the flat egg. Glue those to your banner! Easy and SO cute!
And speaking of the kids...or maybe just adults like me who still like to play with dye...how about using Kool-Aid for some really bright dyed eggs this year? Lemon-aid doesn't do much and grape turns them sort of brown so skip those colors but the others turn out some really gorgeous shades. You don't even need vinegar!
Now onto your table. Juice pitchers, whether clear or decorated like the one above, make for gorgeous vases for your Spring flowers. What an easy and gorgeous centerpiece for your table.
And these little flowerpots, filled with more Spring flowers and then trimmed with glued on grass, would be SO cute at each place setting.
I just recently acquired egg cups and am looking forward to using them this Easter in just this way. Mini cupcake liners tucked into the center and filled with candy would be an adorable detail for your table. 
If you are looking for a craft for the kids here is a simple one. Just graham crackers, royal icing, Easter grass and Peeps are needed to make this sweet little birdhouse! Make one for each person at the table or just one really big one filled with a family of Peeps to decorate your buffet table. 
If you are making up Easter Baskets for the little ones you may consider making these adorable "carrots" for them too. Fill up disposable piping bags, found in the baking section at your local Craft store, with gold fish, orange M&M's, even jelly beans. The kids will love them!
And, of course, we finish off with the cake. Maybe you don't have enough family and friends coming to serve a 3 tier cake but you can still use some of these ideas for your own family cake. Like using cookie cutters to make multi-colored eggs to go on the sides, or Cadbury Chocolate Eggs for the trim. Quick and easy ways to add a little color for your dessert.


Hope we were able to give you some great ideas for your Easter, maybe new ones you had not considered before. We are always on the lookout for new ideas so if you come across some you'd like to share please let us know on our Facebook page! http://www.facebook.com/thecherryontopevents


See you next week!


Cat


Monday, March 12, 2012

Happy Monday! Is the time change effecting you guys too? Of course it could have been the full day I spent with my family in the gardens of Filoli , www.filoli.org , yesterday walking all over the place and overdosing on pollen! LOL! This was all because I knew I had a GREAT blog already in store for all of you.


A winery would be our choice if we were ever to do the "getting married" thing again. To us they are SO romantic and, well, they have wine! Ok, ok, back to the romantic. The winery pictured above is one of my favorites. The Cask Room at Merryvale Vineyards in Napa, www.merryvale.com , is one of the most beautiful venues for a small wedding reception that we have found. 
But maybe you were thinking more of an outdoor reception? Most vineyards have areas, like the one pictured above, where you can set up for your dinner and still have that romantic look. This clean and classic look with the gold chiavari chairs and the chandelier really lets the beauty of the vineyard shine through and act as the majority of your decor.
As always, your event begins with your invitations. These gorgeous brocade invites come from an Australian company called StyleCo. But even if you are not in that country you can find some really beautiful examples of brocade at almost any vendor. We picked the red accent here but almost any color would look gorgeous up against the black and white. And if you don't like the black and white, brocade comes in many other color combinations like brown and white, pink and white and cream and white.
One of the first stations you come to when you arrive at a reception is the Seating Card table. Here is a unique idea that works the winery theme into the decor as well as makes for an elegant way to get the information to your guests. Wondering where you could get all of those corks??? Well, other than drinking a lot of wine before your wedding? You can buy them, in bulk, at Lets Do Wine, http://www.letsdowine.com/corkscorkers.html , and put this craft together in about an hour!
If you are thinking about your tables now and how your guests will know which table to find after they get their number here is a very elegant way to mark your tables! These are actually available at Michael's Craft Stores! Yup, so elegant and affordable!
If you are looking for something more unusual, and more inside the theme of the winery, how about these Wine Bottle Table Numbers? You can buy the bottle labels and print them out at home. Make the winery happy by putting the number on the backside of one of their bottles and you make lots of people happy!
Another way to show off your numbers is by using more of those leftover wine corks! Glue together the bottoms of the corks and tie them together with a bit of twine or your coordinating ribbon and then slide the printed number in between. So easy, so elegant!
Now, onto the place settings. Square plates have become very popular for those who want a less traditional look to their tablescapes. By using black linens and then layering the white plates, black napkins, black and white menu cards and the favors, you get a very sophisticated and elegant look to your tables with very little work involved.

 
And, speaking of favors, these wineglass candles or adorable wine stoppers would make for a very nice take home gifts for your guests. However, many wineries have their own favor sets so don't forget to ask and see what they have to offer your guests!
Like these wonderful wine bottles with your own personalized labels! Any winery would be pleased for you to buy a few cases from them so you can put on your own labels and have your guests take home a bit of the winery with them!
On to the lighting. Especially if you have a grand staircase like this one, using wine bottles, that have had the bottoms cut off, for candle domes is gorgeous and elegant! Use them to light your aisle, your pathways, your tables. 
If you have a larger budget then you can get even more into your lighting and floral schemes and perhaps put together something like the arrangement pictured above. Using silver candlesticks to hold your tall flower arrangements, adding in drops of crystals to catch the light and then different levels of wine glasses as candle holders you can get a lot of reflected light for your tables.
Are you looking for something more clean looking, less cluttered? How about using different sizes of cylinder vases to hold branches or grapevines and floating candles? A very elegant way to spread light down your tables.
Of course we have to cover the cake! With the advent of "icing sheets", it's even more affordable to have brocade for your wedding. The traditional way of adding brocade to a cake, like this one here, is to stencil it on with royal icing which is labor intensive. Icing sheets go on easily and they are inexpensive so many more bakeries will be able to offer it at affordable rates. Gorgeous!
Just a quick word about your actual Wedding Ceremony. There are many ways you can fit the winery theme into your day including your ceremony. Even if your ceremony is held in a Church, you could hang letters made from wine corks on the doors or on the back of the first set of pews going into the Church to set your theme.
If you look around at stores like Michael's and even many bridal shops, you can find more coordinating pieces such as this ring pillow which echos the Black and White brocade theme.
And, finally, your bouquet can also echo that theme. Wrapped in lovely brocade fabric and then ringed with grosgrain ribbon and crystal buttons, this bouquet would make any girl smile. And don't forget your guy! Lots of ideas for his boutonniere including this smaller version of your bouquet!

We hope you have found some ideas for your own event, even if it's only an Anniversary party, and have enjoyed your little "party" experience this week on the Blog!

See you next Monday!


Cat

Monday, March 5, 2012

Happy Monday! This past weekend brought us a Baby Shower! It was a lot of fun for us since the Mom to Be is not just a repeat client of ours but a long time friend as well. She and her husband are welcoming their second child and, as with the first (an adorable daughter), they have chosen not to find out if the new baby is a girl or a boy until the birth. This limits your color palette, when it comes to baby stuff, to colors like yellow, green, brown, or cream. And most of the decorations you find are truly just awful. So you really have to think outside of the box and, for us, we just knew it was a perfect fit when we discovered a Rubber Ducky theme!
The invitations were the first step and the initial reason we decided that the Rubber Ducky theme was going to work perfectly for us! These from Zazzle.com were an easy choice. They are just so cute! We added the little insert card ourselves. The "diaper game" has picked up in popularity over the past few years. Bring a pack of diapers and you are automatically entered for the "Door Prize". As guests arrive you simply write down the names of those who brought diapers and then, at about halfway through the party, you put those names down on pieces of paper and have the Mom to Be draw out a name or two for prizes!
We found this cute duck at Party City. It's a different take on the usual "sign in" sheet or "Guest Book". Guests were able to sign a little message to the expectant parents and it became Nursery decor after the party!
To show you the table decor I'm breaking it up into pieces. These plates are from Chinet and all we did was add inserts to the bottom of the plate with some clear scrapbooking tape. This personalized the plates and helped to add a bit more decoration to our tables at the same time.
Our centerpieces were also Rubber Ducky themed! We just used little crystal bowls filled with colored water and a mini Rubber Duck and then nestled that into a pile of Easter Grass. We used two different colors of green to add a bit more texture.
Michaels Craft Stores carry several different lines of favor "kits". This little round tin came with the labels but I have to warn you. The labels didn't work with our printer well. We ended up getting different labels and cutting them out with a circle punch and then placing them on the lid of these Lemonheads filled tins.
Of course we did Personalized Water Bottle Favors! This cute ducky design that we found online was just too perfect for our theme! The wonderful thing about water bottles is that they are both one of the refreshments as well as being a favor. We always make extra for those who want to drink their water at the event but also would like to take one home with them as a favor!
We covered the tables with a yellow tablecloth first and then added a green "runner" down the center of each. The bright yellow cups with green and yellow napkins and orange flatware completed our place settings beautifully!
Overhead, in several areas of the room, were bunches of green and yellow balloons tied with coorinating curly ribbon. Whenever possible we try to decorate from the floor up to the ceiling. This gives a more rounded image for your guests to enjoy when they first see the room and all throughout the event. We just gathered a dozen regular balloons, no helium needed, up into bunches and then taped the bunches with the hanging ribbon to a center beam in the room. This room was not a large one so we only needed 5 of these bunches spaced out to get the full effect we were looking to achieve.
You can see how it all works together with the food tables, banners and gift tables. And speaking of the food table! We had the most amazing caterer work with us who came up with some really great ideas for the food! Everything was wonderful and they worked really hard to set it all up so it was a great part of the room and decor.
The food table was packed with so much really wonderful food. From appetizers such as nuts, deviled eggs, edemame, and veggie trays to the main finger foods of pasta salad, quiche, baked artichoke squares to a healthy dessert of strawberries, apples and pineapple. But our favorite pieces on the food table were...
the snails! These adorable roll ups were made into garden snails by adding mini pickles for bodies (one tray with dill, one tray with sweet) and cilantro for feelers. The roll up on the back of the snail was so good! Grilled tortillas filled with meat, cheeses, spreads and tomatoes then all rolled up and attached with the toothpick into the pickles made for a treat everyone was talking about the entire party! But we also loved the...
two types of Ducky Sandwiches! Egg Salad and Chicken Salad were placed onto white bread and then cut out with duck cookie cutters to make these adorable additions to the food table. Notice the perfect Menu Cards that the caterer came up to coordinate with the theme! Perfect!
Each guest ended up with a wonderful plate full of food that was so good I think most of them went back for a second plate full! LOL! You can't ask for more than that from your caterer or your food table at an event! But speaking of wanting special food...there's always cake right???
Well, with us there is always cake! This little laundry basket was an 8x6 inch hand carved oval yellow chiffon cake filled with vanilla buttercream and then decorated with more buttercream and fondant baby "blankets. We finally topped it with a light up Rubber Ducky and decorated the base with buttercream "grass" and another duck to complete our theme. The only non-edible pieces  were the ducks and the handles for the basket. Notice the yellow ceramic bowl holding the orange cake forks in the background. It was set to the back of the cake with the green and yellow cake plates to add a pop of color that matched the bills on the ducks!
But the cake wasn't the only special touch on the Cake Table. This adorable "Duck Punch" is made with Blue Hawaiian Punch, Gingerale and Sherbet icecream (which makes the "bubbles" that the rubber ducks swim upon!) and is SOOOO good you will want to make sure to make back ups for when your first decanter gets drained! LOL! Along with a couple of pop ups and extra cups and napkins our Cake Table was complete!
We did play a game called Baby Baggie Bonanza. Each colored bag was carrying a simple baby item that began with the coordinating letter on the front of the bag. For instance, B is for bottle, A is for aspirator, etc.
all the way through the letters that spelled out Baby Shower. Each guest was given a print out that had spaces next to each letter and a few minutes to write their guesses of what is in the bags down before the bags are opened and the contents revealed. Then the baby items were put into a basket with other gifts for the Mom to Be!
We saved one of the best pieces for last! Diaper Cakes are pretty much a staple at Baby Showers these days and I am always looking for a new twist on this version. Well, the caterer is also the Mom to Be's Sister in Law and she came up with this wonderful Princess/Prince's Castle Diaper Cake for this Shower. Simply amazing in it's size (about 2ft x 3ft) this "cake" had all kinds of baby products for the expecting family...including, of course, a Rubber Ducky! Such a wonderful gift for the family as well as an amazing coordinating touch for the event!


Hope you enjoyed this little look into what was a really fun baby shower for a very special friend and that you got some good ideas for your next Baby Shower!


Next week we take a look at some Winery Wedding ideas!

Cat